With the release of OS X Mavericks, Apple has added additional features to fdesetup, a valuable command-line tool for enabling, administering and disabling Apple’s FileVault 2 encryption. This tool gives Mac administrators the following command-line abilities:
- Enable or disable FileVault 2 encryption on a particular Mac
- Use a personal recovery key, an institutional recovery key, or both kinds of recovery key
- Enable one or multiple user accounts at the time of encryption
- Get a list of FileVault 2-enabled users on a particular machine
- Add additional users after FileVault has been enabled
- Remove users from the list of FileVault enabled accounts
- Add, change or remove individual and institutional recovery keys
- Report which recovery keys are in use
- Perform a one-time reboot that bypasses the FileVault pre-boot login
- Report on the status of FileVault 2 encryption or decryption
I’ll be taking you through all of the capabilities mentioned above, with a focus on showing exactly how they work. See below the jump for the details.
Enabling FileVault 2 encryption for one or multiple users
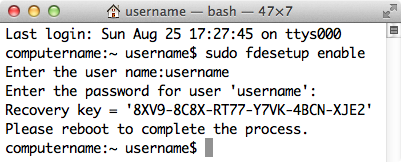
fdesetup is amazingly flexible when it comes to enabling FileVault 2 encryption from the command-line. To start with the simplest method, run the following command to enable FileVault 2 encryption:
sudo fdesetup enable
You’ll be prompted for the username and password of the primary user, which is the account you will work with at the FileVault 2 pre-boot login screen once the encryption is turned on. If everything’s working properly, you’ll next be given an alphanumeric personal recovery key and prompted to restart.
![Figure_1-Using_fdesetup_enable_to_enable_FileVault_2_encryption]()
VERY IMPORTANT: The fdesetup-generated personal recovery key is not saved anywhere outside the machine. Make a record of it or you will not have a recovery key available to help unlock your Mac’s encryption in case of a problem.
You can also enable additional user accounts at the time of encryption, as long as the accounts are either local or mobile accounts on the Mac being encrypted. Run the following command to enable FileVault 2 and specify the accounts you want:
sudo fdesetup enable -user username -usertoadd other_username -usertoadd yet_another_username
You’ll be prompted for the passwords of the accounts specified. After that, you’ll be given an alphanumeric personal recovery key and prompted to restart. All of the accounts specified should appear at the FileVault 2 pre-boot login screen.
![Figure_2-Using_fdesetup_enable_to_enable_FileVault_2_for_multiple_accounts]()
For those who want to automate the process, fdesetup also supports importing a properly formatted plist via a standard input stream (stdin). The plist needs to follow the format below:
<?xml version="1.0" encoding="UTF-8"?>
<!DOCTYPE plist PUBLIC "-//Apple//DTD PLIST 1.0//EN" "http://www.apple.com/DTDs/PropertyList-1.0.dtd">
<plist version="1.0">
<dict>
<key>Username</key>
<string>username</string>
<key>Password</key>
<string>password</string>
<key>AdditionalUsers</key>
<array>
    <dict>
        <key>Username</key>
        <string>username</string>
        <key>Password</key>
        <string>password</string>
    </dict>
    <dict>
        <key>Username</key>
        <string>username</string>
        <key>Password</key>
        <string>password</string>
    </dict>
</array>
</dict>
</plist>
![Figure_3-Plist_format_for_fdesetup_enable]()
Additional users can be included as needed by adding additional user information under the AdditionalUsers plist key.
Note: All account passwords need to be supplied in cleartext.
Once the plist has been set up and properly formatted, run the following command to enable FileVault 2 encryption and reference the account information in the plist file:
sudo fdesetup enable -inputplist < /path/to/filename.plist
Since the accounts and passwords are in the plist file, fdesetup does not need to prompt for passwords. Instead, the alphanumeric personal recovery key is displayed and the user is prompted to restart. All of the accounts specified in the plist file should appear at the FileVault 2 pre-boot login screen.
![Figure_4-Using_fdesetup_enable_with_plist_to_enable_FileVault_2_for_multiple_accounts]()
To avoid the need to enter a password, fdesetup also has a -defer flag that can be used with the enable verb to delay enabling FileVault 2 until after the current (or next) user logs out. With the -defer flag, the user will be prompted for their password at their next logout or restart. The recovery key information is not generated until the user password is obtained, so the -defer option requires a file location where this information will be written to as a plist file.
The property list file will be created as a root-only readable file and contain information similar to what’s show below.
![Figure_5–fdesetup_enable_-defer_recovery_information_plist_format]()
Note: For security reasons, the plist file with the recovery key information should not stay on the encrypted system. Please copy it to a safe location and then securely delete this plist file from the encrypted system.
Run the following command to defer enabling FileVault 2 and specify the account you want:
sudo fdesetup enable -user username -defer /path/to/filename.plist
![Figure_6-Using_fdesetup_enable_-defer_with_specified_user_to_enable_FileVault_2]()
If there is no user account specified with the -user option, then the current logged-in user will be enabled for FileVault 2. If there is no user specified and no users are logged in when the command is run, then the next user that logs in will be chosen and enabled.
If you don’t want to specify the account, run the following command:
sudo fdesetup enable -defer /path/to/filename.plist
![Figure_7-Using_fdesetup_enable_-defer_without_specified_user_to_enable_FileVault_2]()
On logout, the user will be prompted to enter their account password.
![Figure_8-User_being_prompted_to_enter_password_for_deferred_enabling_of_FileVault_2]()
Once entered, FileVault 2 will be enabled and the recovery information plist file will be created. Once the enabling process is complete, the Mac will restart.
![Figure_9-FileVault_2_deferred_enabling_process]()
An important thing to keep in mind about the –defer option is that it enables one single user account at the time of turning on FileVault 2 encryption. The –defer option does not enable multiple user accounts and cannot be used to enable accounts once FileVault 2 encryption has been turned on.
Enabling FileVault 2 encryption using one or multiple recovery keys
Another capability of FileVault 2 in Mavericks is the ability to use the alphanumeric personal recovery key, an institutional recovery key using /Library/Keychains/FileVaultMaster.keychain, or both kinds of recovery key at the same time.
As seen in the earlier examples, fdesetup will provide the alphanumeric personal recovery key by default. To use the institutional recovery key, the -keychain flag needs to be used when enabling encryption:
sudo fdesetup enable –keychain
The alphanumeric personal recovery key is displayed, but the encryption will also use the /Library/Keychains/FileVaultMaster.keychain institutional recovery key. In case recovery is needed, either recovery key will work to unlock or decrypt the encrypted drive.
![Figure_10–Using_fdesetup_enable_-keychain_to_enable_encryption_with_both_recovery_key_types]()
If you want to specify that only the FileVaultMaster.keychain institutional recovery key be used, both the -keychain and -norecoverykey flags need to be used when enabling encryption:
sudo fdesetup enable -keychain –norecoverykey
![Figure_11–Using_fdesetup_enable_-keychain_-norecoverykey_to_enable_encryption_with_only_the_institutional_recovery_key]()
fdesetup is also capable of creating an institutional recovery key, using the -certificate flag to import an existing FileVault 2 public key. Once imported, fdesetup will automatically create a FileVaultMaster.keychain file to store the public key and save the keychain to /Library/Keychains.
The public key will need to be available as a DER encoded .cer certificate file. Once the certificate is available, the following command can be run to enable FileVault 2, automatically create the institutional recovery key with the supplied public key and store it as /Library/Keychains/FileVaultMaster.keychain:
sudo fdesetup enable -certificate /path/to/filename.cer
![Figure_12–Using_fdesetup_enable_-certificate_to_enable_encryption_with_an_imported_certificate]()
To specify that only the FileVaultMaster.keychain institutional recovery key be used, add the -norecoverykey flag to the command:
sudo fdesetup enable -certificate /path/to/filename.cer -norecoverykey
![Figure_13–Using_fdesetup_enable_-certificate_-norecoverykey_to_enable_encryption_with_only_the_imported_certificate]()
It is also possible to include the public key data in a plist file, which allows the use of a plist to set up the institutional recovery key. The plist needs to follow the format below:
<?xml version="1.0" encoding="UTF-8"?>
<!DOCTYPE plist PUBLIC "-//Apple//DTD PLIST 1.0//EN" "http://www.apple.com/DTDs/PropertyList-1.0.dtd">
<plist version="1.0">
<dict>
<key>Username</key>
<string>username</string>
<key>Password</key>
<string>password</string>
<key>AdditionalUsers</key>
<array>
    <dict>
        <key>Username</key>
        <string>username</string>
        <key>Password</key>
        <string>password</string>
    </dict>
    <dict>
        <key>Username</key>
        <string>username</string>
        <key>Password</key>
        <string>password</string>
    </dict>
</array>
<key>Certificate</key>
<data>
(Certificate data goes here…)
</data>
</dict>
</plist>
Using the public key’s DER encoded certificate file, the public key data for the plist can be obtained using the base64 tool by using the following command:
base64 /path/to/filename.cer > /path/to/filename.txt
At this point, you would copy the data string contained in the text file and place it into the Certificate <data></data> value area of the plist file. You would store either the password of an existing FileVault 2-enabled user or (if available) an existing personal recovery key in the Password key in the plist.
![Figure_14–Plist_format_with_institutional_public_key_data]()
Forcing a restart when enabling FileVault 2
Along with the various options for enabling, it’s also possible to force a restart of the Mac once FileVault 2 has been successfully configured. This can help automate the process of enabling FileVault 2 on a Mac if no input from a logged-in user is needed.
For example, an institution may want to pre-configure its Macs to automatically encrypt with FileVault 2 at first boot with a local admin account enabled. It also wants to use only the institutional recovery key. If a plist with the desired account information and public key data to create the institutional recovery key is available, the following command could be run to enable FileVault 2 and force a restart at the first boot:
sudo fdesetup enable -inputplist < /path/to/filename.plist -norecoverykey -forcerestart
Once fdesetup had finished enabling the accounts in the plist file and creating /Library/Keychains/FileVaultMaster.keychain, the Mac would immediately restart and display the enabled accounts at the pre-boot login screen.
If you want to use the alphanumeric personal recovery key with -forcerestart, you will also need to output the personal recovery key and other information into a plist file. Taking the example above, the institution’s automated setup would run the following command to automatically encrypt with FileVault 2 at first boot using both types of recovery key and a local admin account enabled:
sudo fdesetup enable -inputplist < /path/to/filename.plist -outputplist > /path/to/recoverykeyinfo.plist –forcerestart
Disabling FileVault 2
In contrast to all of the various options available for enabling FileVault 2 using fdesetup, the command to turn off FileVault 2 encryption is the following:
sudo fdesetup disable
Adding additional users after FileVault has been enabled
Once FileVault 2 has been enabled, you can add additional users using fdesetup. To do so, you will need to a) wait until the FileVault 2 encryption has completed and b) provide both the username and password of a previously enabled account as well as the password of the account you want to add. The following command will enable a local user named administrator:
sudo fdesetup add -usertoadd administrator
![Figure_15–Using_fdesetup_add_-usertoadd_to_enable_additional_accounts]()
For those who want to automate the process, fdesetup also supports importing a properly formatted plist via a standard input stream (stdin). The plist needs to follow the format below:
<?xml version="1.0" encoding="UTF-8"?>
<!DOCTYPE plist PUBLIC "-//Apple//DTD PLIST 1.0//EN" "http://www.apple.com/DTDs/PropertyList-1.0.dtd">
<plist version="1.0">
<dict>
<key>Username</key>
<string>username</string>
<key>Password</key>
<string>password</string>
<key>AdditionalUsers</key>
<array>
    <dict>
        <key>Username</key>
        <string>username</string>
        <key>Password</key>
        <string>password</string>
    </dict>
    <dict>
        <key>Username</key>
        <string>username</string>
        <key>Password</key>
        <string>password</string>
    </dict>
</array>
</dict>
</plist>
When adding additional users using a plist file, the top level Username key is ignored, and the Password key value should either be an existing FileVault user’s password or the recovery key. Additional users can be added as needed by adding additional user information under the AdditionalUsers plist key.
Note: All account passwords need to be supplied in cleartext.
![Figure_16-Plist_format_for_fdesetup_add]()
Once the plist has been set up and properly formatted, run the following command to add additional users by referencing the account information in the plist file:
sudo fdesetup add -inputplist < /path/to/filename.plist
![Figure_17–Using_fdesetup_add_–inputplist_to_enable_accounts]()
Listing current FileVault 2 users
To list all accounts enabled for FileVault 2, run the following command:
sudo fdesetup list
All accounts will be listed with both the accounts’ username and UUID
![Figure_18–Using_fdesetup_list_to_show_enabled_accounts]()
Remove users from the list of FileVault enabled accounts
You can remove users from the list of FileVault enabled accounts by using either their username or the account’s UUID. To remove the account using the username, run the following command:
sudo fdesetup remove -user username
![Figure_19–Using_fdesetup_remove_with_username]()
To remove the account using the account’s UUID, run the following command:
sudo fdesetup remove -uuid UUID_here
![Figure_20–Using_fdesetup_remove_with_UUID]()
In both cases, successful removal of the account will not produce any additional output. If the account being removed is not currently enabled for use with FileVault 2, an error message will be displayed.
![Figure_21-fdesetup_remove_error_when_specified_account_is_not_FileVault_2_enabled]()
Managing individual and institutional recovery keys
fdesetup in Mavericks adds the new ability to change, add and remove both personal and institutional recovery keys. This gives Mac admins much greater ability to manage recovery keys, including the capability to quickly update or remove compromised personal and/or institutional recovery keys in the event of a data breach or other problem.
You can add or change recovery keys using fdesetup changerecovery. To change to a new personal key, run the following command:
sudo fdesetup changerecovery -personal
You’ll be prompted for the password of an existing FileVault 2-enabled user or the existing personal recovery key. Once entered, a new personal recovery key will be generated and displayed. The former personal recovery key will no longer work.
![Figure_22–Using_fdesetup_changerecovery_to_change_to_a_new_personal_recovery_key]()
For those who want to automate the process, fdesetup also supports importing a properly formatted plist via a standard input stream (stdin). The plist needs to follow the format below:
<?xml version="1.0" encoding="UTF-8"?>
<!DOCTYPE plist PUBLIC "-//Apple//DTD PLIST 1.0//EN" "http://www.apple.com/DTDs/PropertyList-1.0.dtd">
<plist version="1.0">
<dict>
<key>Password</key>
<string>password</string>
</dict>
</plist>
![Figure_23-Plist_format_for_fdesetup_changerecovery_personal]()
You would store either the password of an existing FileVault 2-enabled user or the existing personal recovery key in the Password key in the plist.
Once the plist has been set up and properly formatted, run the following command to change to a new personal recovery key and reference the password or recovery key in the plist file:
sudo fdesetup changerecovery -personal -inputplist < /path/to/filename.plist
![Figure_24–Using_ fdesetup_changerecovery_personal_with_inputplist]()
In the event that the Mac in question does not have a personal recovery key, running the commands above will add a personal recovery key instead of changing an existing one.
To change to a new institutional recovery key, you will need to have the new public key available. If you have a new institutional public key available as a DER encoded certificate file, you can run the following command to replace the current institutional key:
sudo fdesetup changerecovery -institutional -keychain -certificate /path/to/filename.cer
If an institutional keychain is being used on this Mac, you will see a message that an existing FileVault Master keychain was found and moved. The reason for this is that, as part of this process, the current institutional key’s /Library/Keychains/FileVaultMaster.keychain file is replaced with a new /Library/Keychains/FileVaultMaster.keychain file that includes the new institutional recovery key’s public key.
![Figure_25–Using_fdesetup_changerecovery_to_change_to_a_new_institutional_recovery_key]()
While the former institutional key’s /Library/Keychains/FileVaultMaster.keychain was moved and not deleted, the former institutional recovery key will no longer work.
For those who want to automate the process, fdesetup also supports importing a properly formatted plist via a standard input stream (stdin). The plist needs to follow the format below:
<?xml version="1.0" encoding="UTF-8"?>
<!DOCTYPE plist PUBLIC "-//Apple//DTD PLIST 1.0//EN" "http://www.apple.com/DTDs/PropertyList-1.0.dtd">
<plist version="1.0">
<dict>
<key>Password</key>
<string>password</string>
<key>Certificate</key>
<data>
(Certificate data goes here…)
</data>
</dict>
</plist>
![Figure_26-Plist_format_for_fdesetup_changerecovery_institutional]()
You can also use the current institutional recovery key to authenticate the change to the new institutional key. If you have a keychain file available containing the private key of the current institutional key, you can run the following command to replace the current institutional key:
sudo fdesetup changerecovery -institutional -keychain -certificate /path/to/filename.cer -key /path/to/filename.keychain
You’ll be prompted for the keychain’s password. Once entered, the current institutional key will be replaced with the new one.
![Figure_27–Using_fdesetup_changerecovery_with_institutional_recovery_keychain]()
In the event that the Mac in question does not have a institutional recovery key, running the commands above (with the exception of using the current institutional key for authentication) will add a institutional recovery key instead of changing an existing one.
Removing individual and institutional recovery keys
You can remove recovery keys using fdesetup removerecovery. To remove the current personal recovery key, run the following command:
sudo fdesetup removerecovery -personal
You’ll be prompted for the password of an existing FileVault 2-enabled user or the existing personal recovery key. Once entered, the personal recovery key will be removed from the system. The former personal recovery key will no longer work.
![Figure_28–Using_fdesetup_removerecovery_to_remove_a_personal_recovery_key]()
For those who want to automate the process, fdesetup also supports importing a properly formatted plist via a standard input stream (stdin). The plist needs to follow the format below:
<?xml version="1.0" encoding="UTF-8"?>
<!DOCTYPE plist PUBLIC "-//Apple//DTD PLIST 1.0//EN" "http://www.apple.com/DTDs/PropertyList-1.0.dtd">
<plist version="1.0">
<dict>
<key>Password</key>
<string>password</string>
</dict>
</plist>
You would store either the password of an existing FileVault 2-enabled user or the existing personal recovery key in the Password key in the plist.
![Figure_29-Plist_format_for_fdesetup_removerecovery]()
Once the plist has been set up and properly formatted, run the following command to remove the current personal recovery key and reference the password or recovery key in the plist file:
sudo fdesetup removerecovery -personal -inputplist < /path/to/filename.plist
![Figure_30–Using_ fdesetup_removerecovery_personal_with_inputplist]()
To remove institutional recovery keys, run the following command:
sudo fdesetup removerecovery -institutional
You’ll be prompted for the password of an existing FileVault 2-enabled user. Once entered, the institutional recovery key will be removed from the system and will no longer work.
![Figure_31–Using_fdesetup_removerecovery_to_remove_an_institutional_recovery_key]()
The removal of the institutional key can also be automated using a properly formatted plist via a standard input stream (stdin). The plist is the same as the one used for removing the personal key.
Once the plist has been set up and properly formatted, run the following command to remove the institutional recovery key and reference the password or recovery key in the plist file:
sudo fdesetup removerecovery -institutional -inputplist < /path/to/filename.plist
![Figure_32–Using_fdesetup_removerecovery_–institutional_with_-inputplist]()
You can also use the recovery key associated with an institutional key to authenticate the removal of that institutional key. Once authenticated, the institutional key is removed from the system and will no longer work.
If you have a keychain file containing the private key for the current institutional key available, you can run the following command to remove the current institutional key:
sudo fdesetup removerecovery -institutional -key /path/to/filename.keychain
![Figure_33–Using_fdesetup_removerecovery_with_institutional_recovery_keychain.png]()
It is possible to use fdesetup removerecovery to remove one or both recovery keys on a particular Mac. Once the recovery keys are removed, the only way to unlock the FileVault 2 encryption is by using the password of an enabled account. That said, you can use fdesetup changerecovery to add one or both types of recovery keys back to the encrypted Mac.
Recovery key reporting
To go along with the ability to manage recovery keys, fdesetup in Mavericks enables Mac admins to detect which types of recovery keys are in use on a particular Mac. To check if a personal recovery key is in use, run the following command:
sudo fdesetup haspersonalrecoverykey
If FileVault 2 is using a personal recovery key, this command will return true. Otherwise it will return false.
![Figure_34–Using_fdesetup_haspersonalrecoverykey]()
To check if an institutional recovery key is in use, run the following command:
sudo fdesetup hasinstitutionalrecoverykey
If FileVault 2 is using an institutional recovery key, this command will return true. Otherwise it will return false.
![Figure_35–Using_fdesetup_hasinstitutionalrecoverykey]()
One-Time FileVault 2 encryption bypass
fdesetup in Mavericks has the authrestart verb, which allows a FileVault 2-encrypted Mac to restart, bypass the FileVault 2 pre-boot login screen, and goes straight to the OS login window. To restart and bypass the FileVault 2 pre-boot login screen, run the following command:
sudo fdesetup authrestart
When you run the fdesetup authrestart command, it asks for the password of an existing FileVault 2-enabled user or a personal recovery key.
![Figure_36–Using_fdesetup_authrestart]()
Once authenticated, the authrestart process puts an unlock key in system memory and reboots. On reboot, the reboot process automatically clears the unlock key from memory.
fdesetup authrestart may not be supported by all Mavericks-compatible Macs. To verify if a specific Mac supports authrestart, run the following command:
sudo fdesetup supportsauthrestart
If the Mac supports fdesetup authrestart, this command will return true. Otherwise it will return false.
![Figure_37–Using_fdesetup_supportsauthrestart]()
Reporting on FileVault 2 encryption or decryption status
fdesetup can report on FileVault 2 encryption or decryption status. The following command will display the current state:
sudo fdesetup status
![Figure_38-fdesetup_status_reporting_decryption_status]()
![Figure_39-fdesetup_status_reporting_encryption_status]()
Conclusion
fdesetup was already a Swiss Army knife for enabling and managing FileVault 2 when it first appeared in Mountain Lion. In Mavericks, Apple has built on that strong foundation to add even more functionality. fdesetup in Mavericks can enable FileVault 2, add and remove users from the list of FileVault 2 authorized accounts, manage recovery keys, report on FileVault 2′s status and more. Among it’s greatest strengths are:
- It allows options for automating FileVault 2 setups via scripting.
- fdesetup’s defer option can be used to set up a self-service procedure for enabling encryption.
- It supports multiple recovery keys for FileVault 2, giving Mac admins more options for handling recovery situations.
- It allows you to rotate or remove recovery keys on an as-needed basis.
If you’re managing FileVault 2 encryption in your own environment, I strongly recommend using this tool. Properly used, it will save you time and give encryption options available with no other software.
![]()
![]()